> ## Documentation Index
> Fetch the complete documentation index at: https://docs.aisync.link/llms.txt
> Use this file to discover all available pages before exploring further.
# Workflows
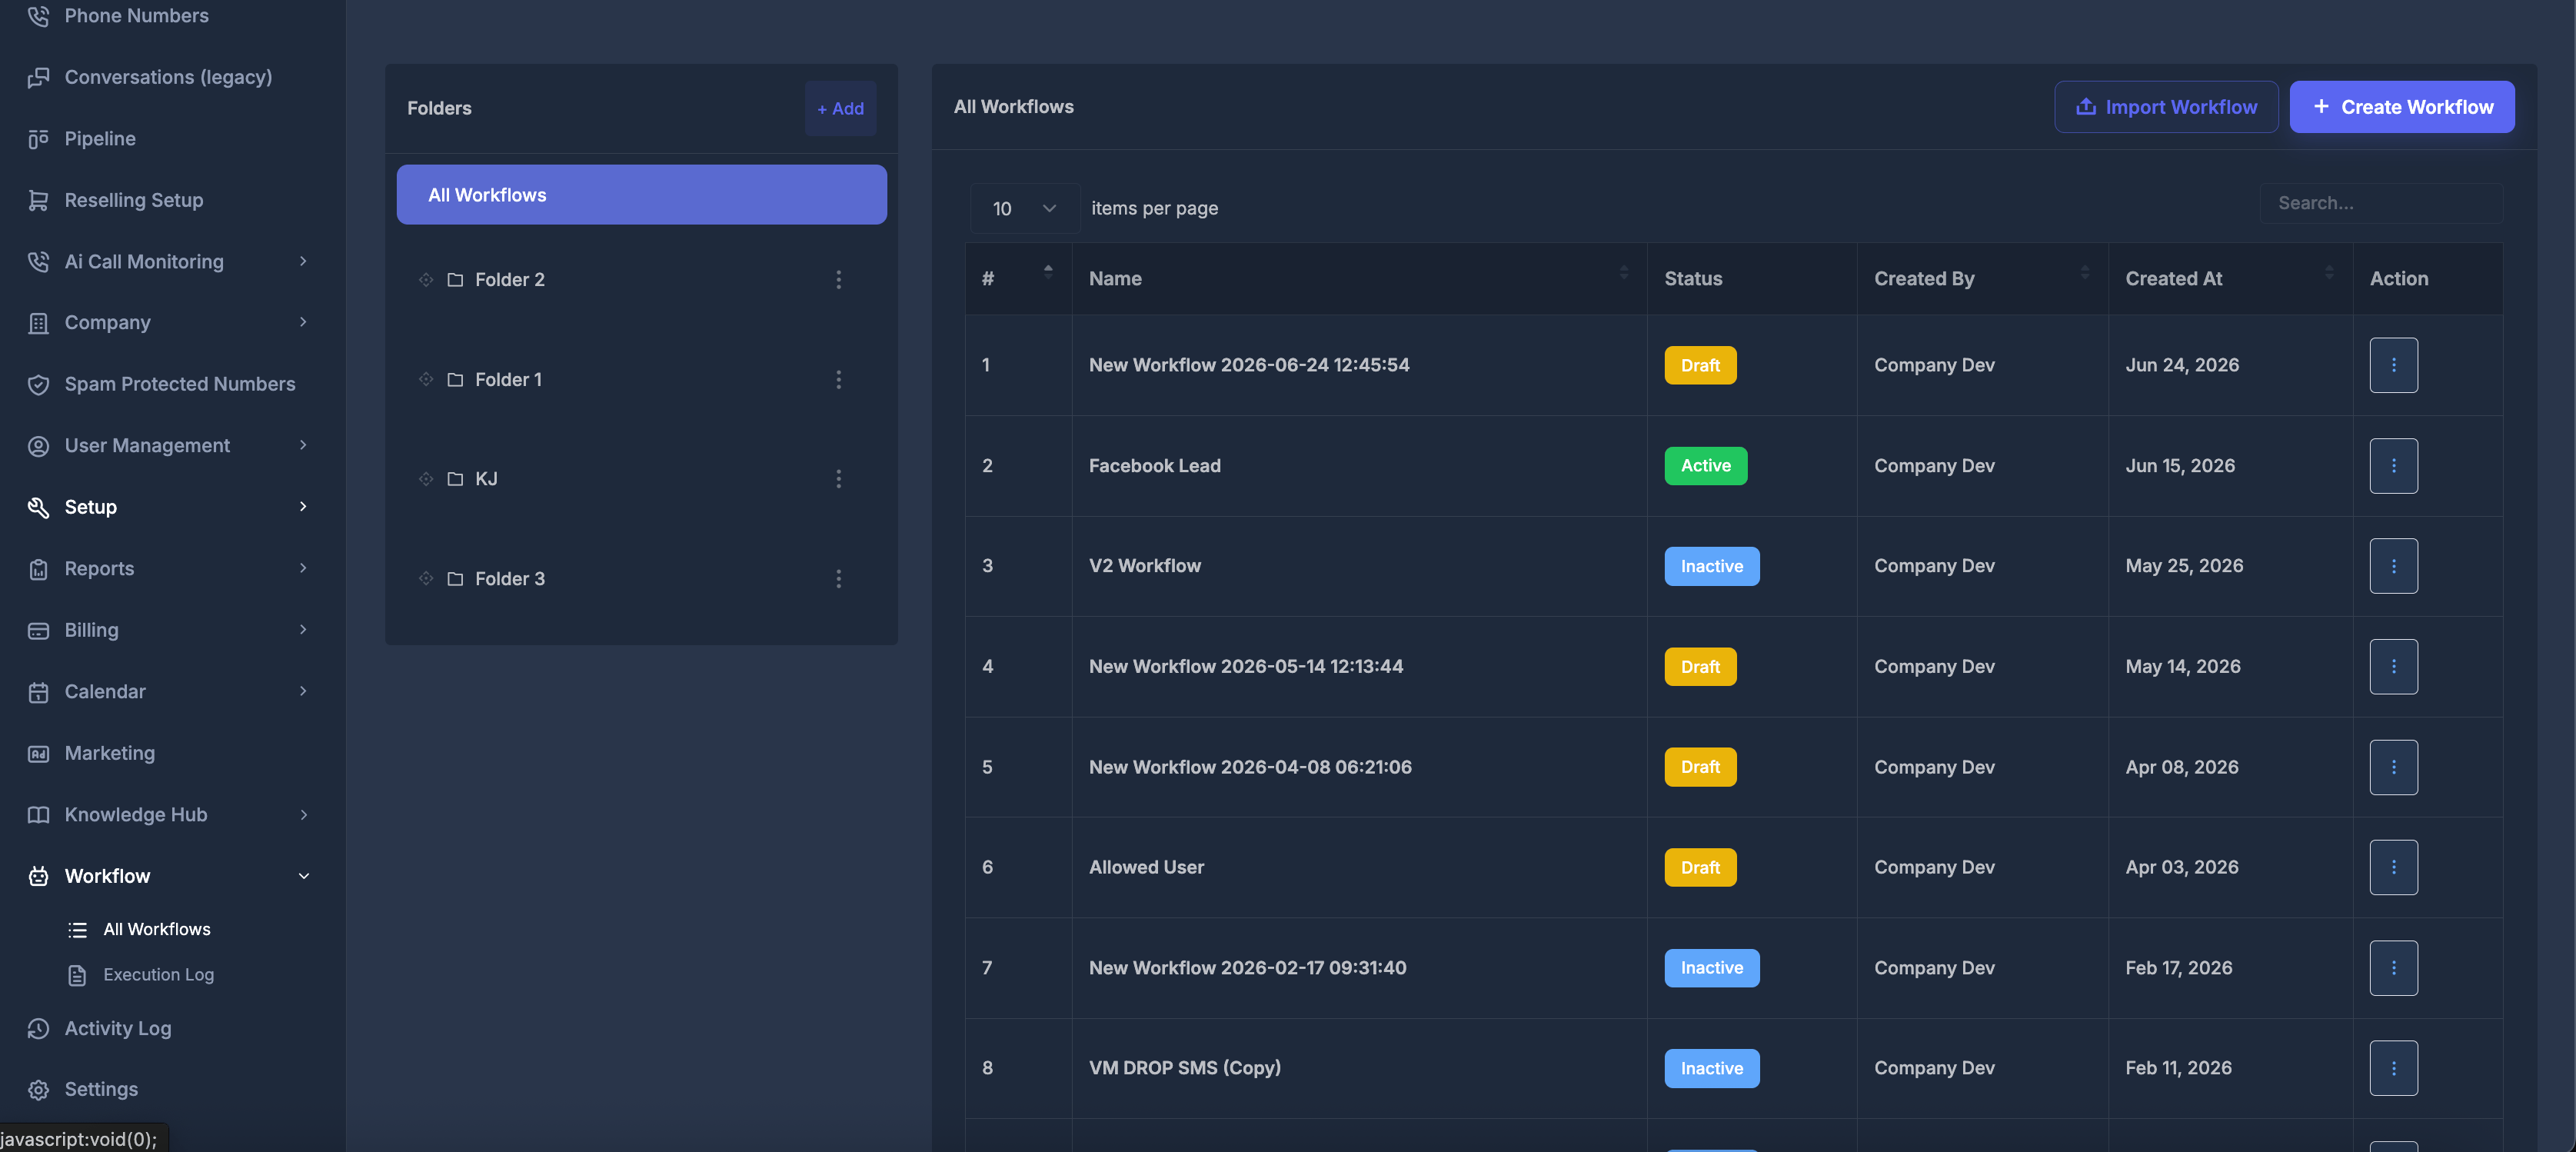
The **Workflows** page is where you manage automation workflows in RizzDial. A workflow is an automated process that starts from a trigger, such as a new contact or a specific activity, and then performs actions like messaging, calling, tagging, updating contact details, or moving a lead through a process.
 ## 🎯 What This Page Is Used For
Use the Workflows page when you want to:
* View all workflows in one place
* Create a new workflow
* Open an existing workflow for editing
* Organize workflows into folders
* Search and browse workflows
* Activate or deactivate workflows
* Duplicate an existing workflow
* Import a workflow from a JSON file
* Export a workflow as a JSON file
* Move a workflow into a different folder
* Delete workflows that are no longer needed
The Workflows page has two main areas.
### 📋 Workflows Table
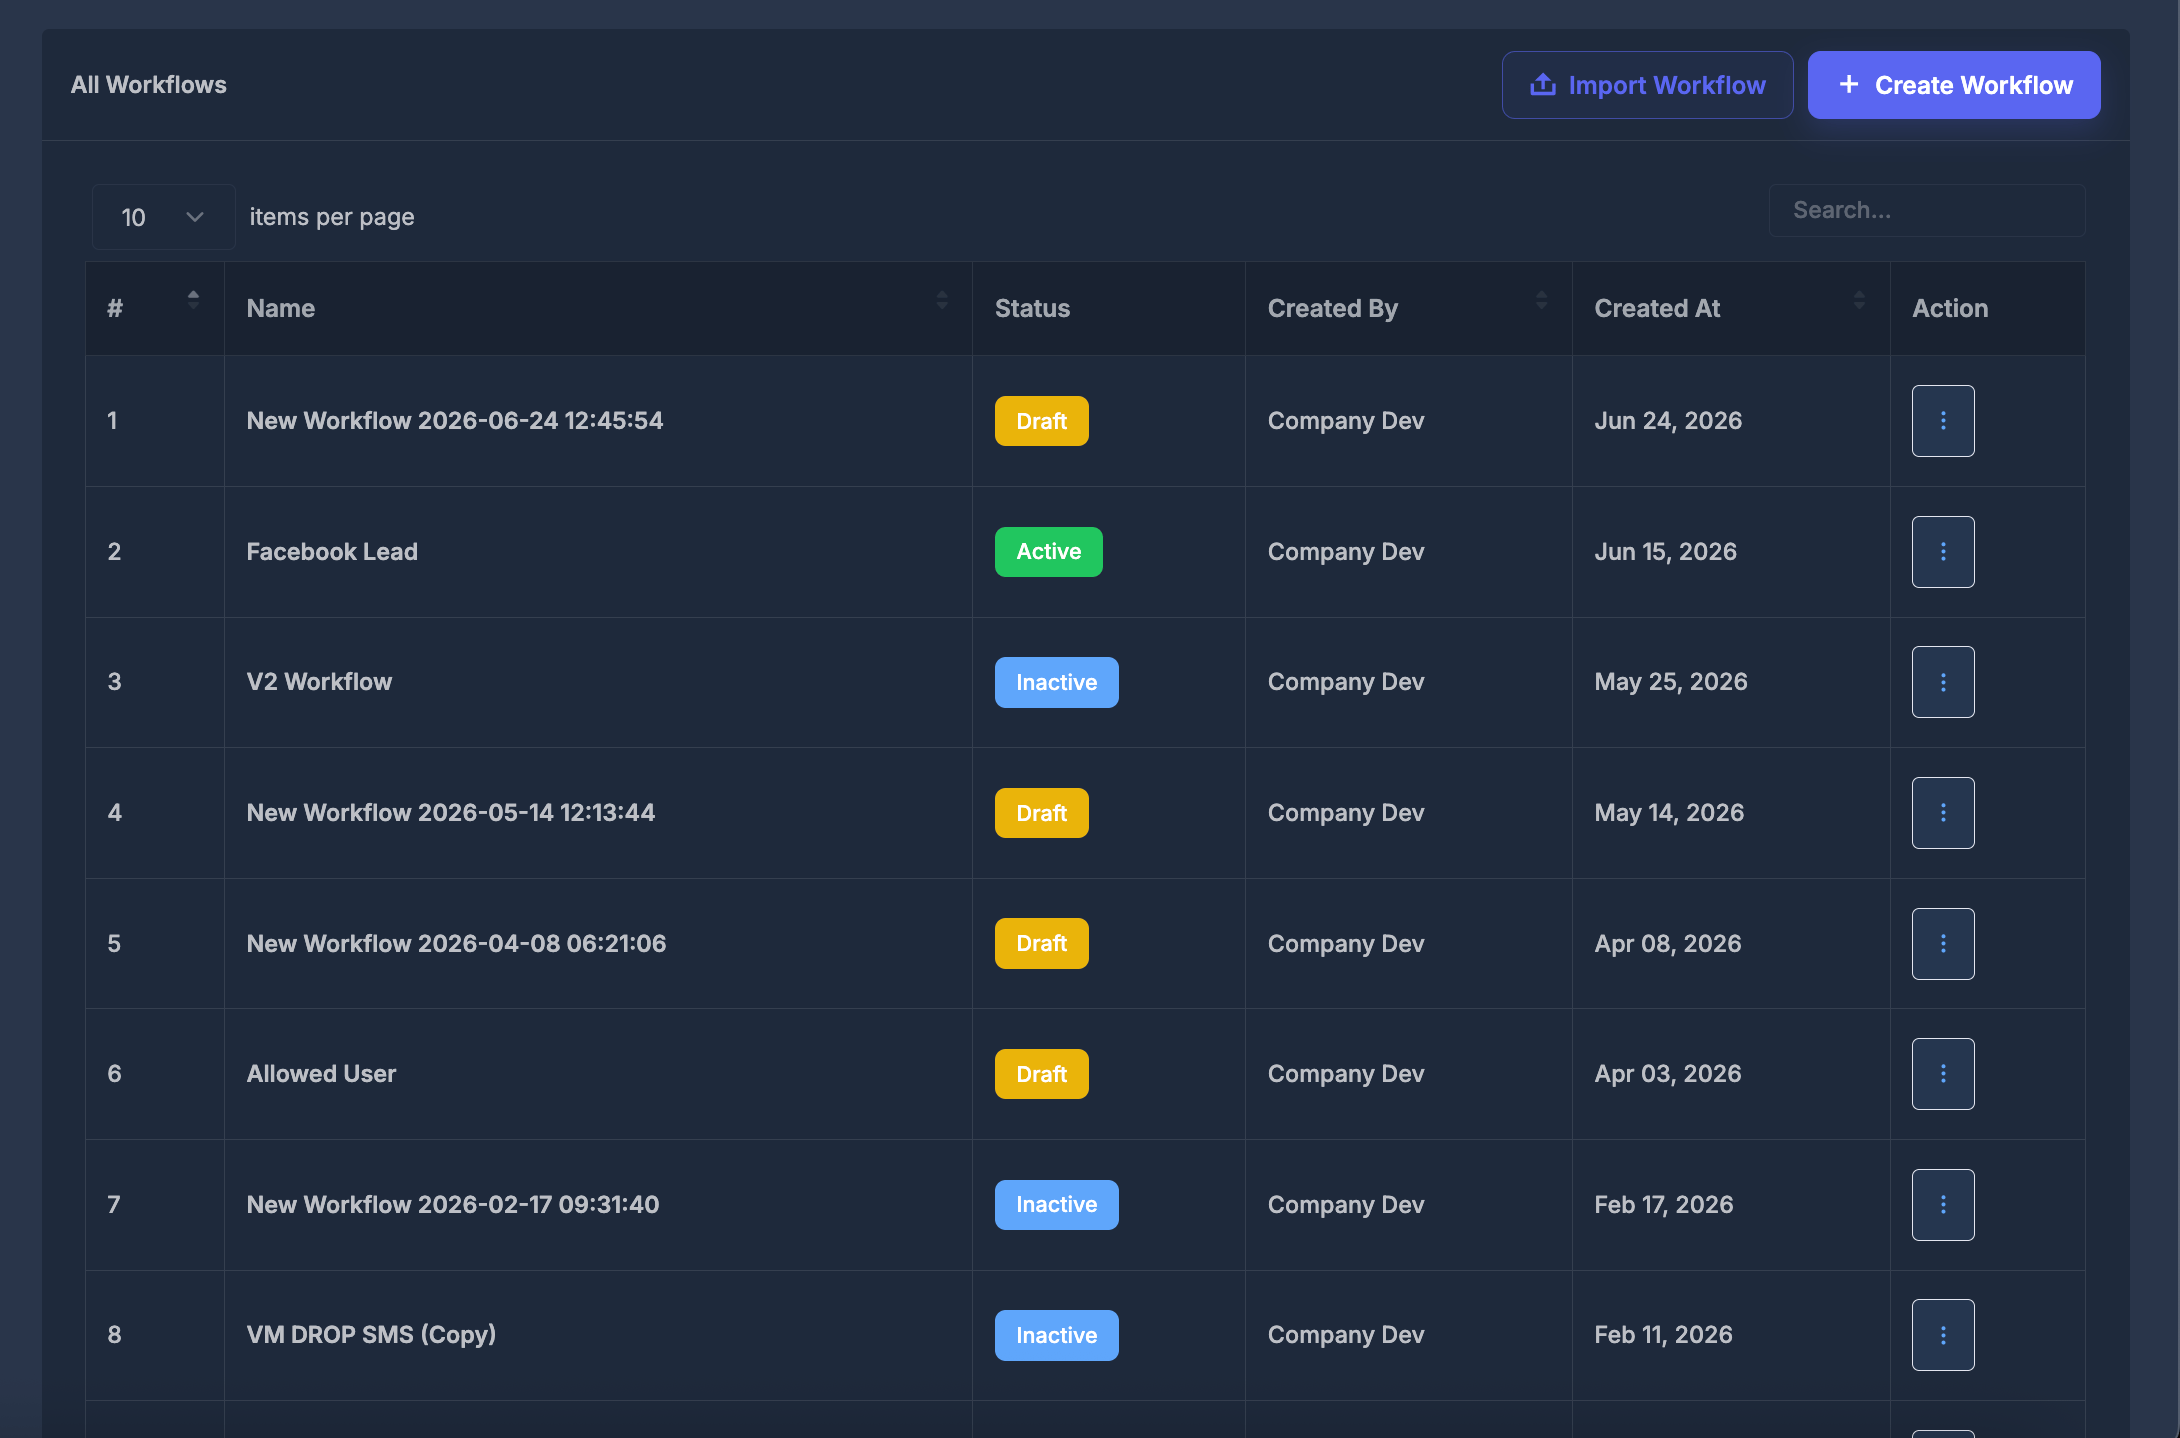
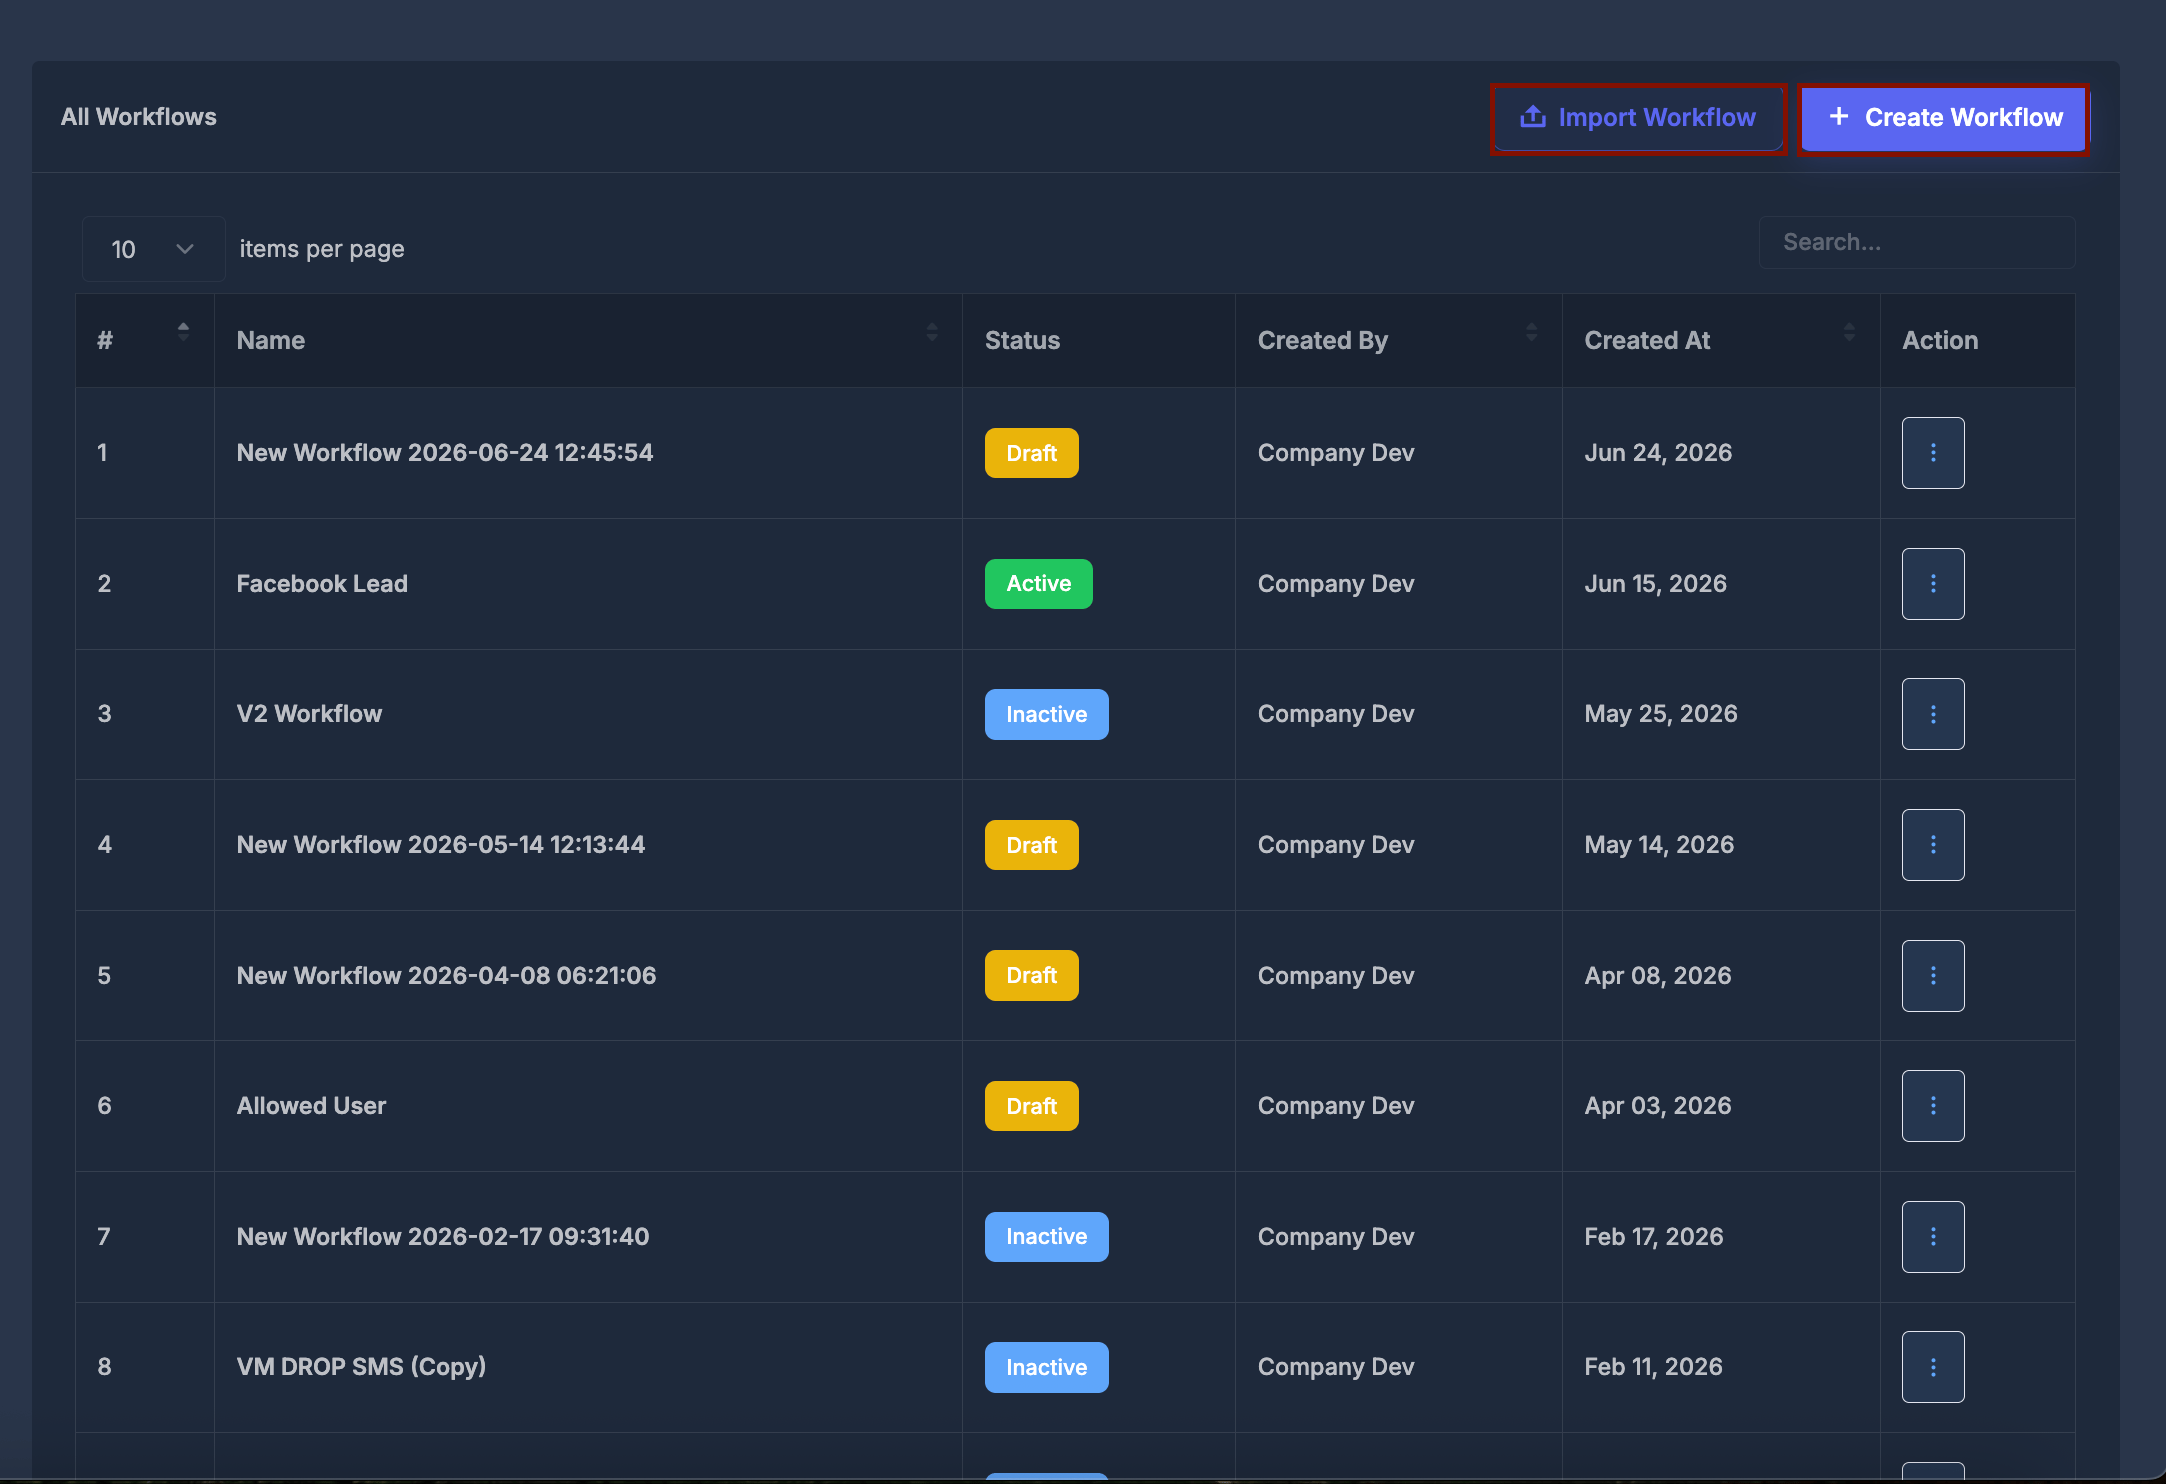
The right side shows the workflow list. Each workflow row includes:
* Number
* Workflow name
* Status
* Created by
* Created date
* Action menu
The workflow name is clickable. Clicking it opens the workflow builder so you can review or edit the automation.
## 🎯 What This Page Is Used For
Use the Workflows page when you want to:
* View all workflows in one place
* Create a new workflow
* Open an existing workflow for editing
* Organize workflows into folders
* Search and browse workflows
* Activate or deactivate workflows
* Duplicate an existing workflow
* Import a workflow from a JSON file
* Export a workflow as a JSON file
* Move a workflow into a different folder
* Delete workflows that are no longer needed
The Workflows page has two main areas.
### 📋 Workflows Table
The right side shows the workflow list. Each workflow row includes:
* Number
* Workflow name
* Status
* Created by
* Created date
* Action menu
The workflow name is clickable. Clicking it opens the workflow builder so you can review or edit the automation.
 ## 📁 Folders
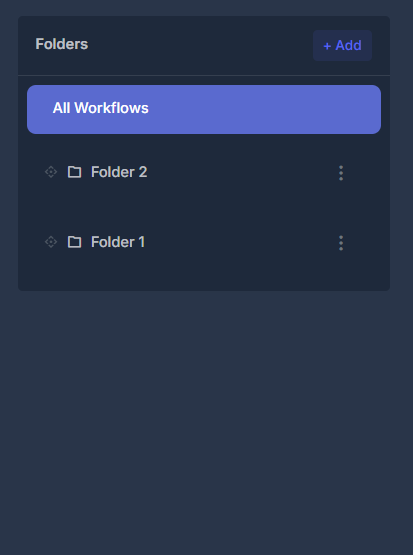
Folders are optional, but they are useful when an account has many workflows.
### ➕ Add a Folder
Click **Add** in the Folders panel.
Enter a folder name, then click **Save**. After saving, the folder appears in the folder list.
## 📁 Folders
Folders are optional, but they are useful when an account has many workflows.
### ➕ Add a Folder
Click **Add** in the Folders panel.
Enter a folder name, then click **Save**. After saving, the folder appears in the folder list.
 ### ✏️ Edit a Folder
Open the folder's three-dot menu and choose **Edit**.
Update the folder name, then save it.
### ✏️ Edit a Folder
Open the folder's three-dot menu and choose **Edit**.
Update the folder name, then save it.
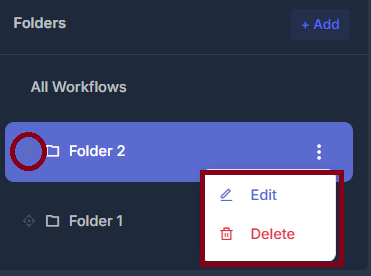 **🗑️ Delete a Folder**
Open the folder's three-dot menu and choose **Delete**.
When a folder is deleted, workflows inside it are moved to **No Folder**. The workflows themselves are not deleted.
**↕️ Reorder Folders**
Folders can be reordered by dragging the handle beside a folder name.
After dropping the folder in a new position, the order is saved automatically.
**🗑️ Delete a Folder**
Open the folder's three-dot menu and choose **Delete**.
When a folder is deleted, workflows inside it are moved to **No Folder**. The workflows themselves are not deleted.
**↕️ Reorder Folders**
Folders can be reordered by dragging the handle beside a folder name.
After dropping the folder in a new position, the order is saved automatically.
 **🔖 Remembered Folder Selection**
When you select a folder, the page remembers that selection in the browser. If you come back later, the same folder can be selected again automatically.
If that folder no longer exists, the page returns to **All Workflows**.
**🏷️ Workflow Status**
Each workflow has a status badge.
Common statuses are:
| Status | Meaning |
| - | - |
| **Active** | The workflow is turned on and can run |
| **Inactive** | The workflow is turned off |
| **Draft** | The workflow is still being prepared and should be reviewed before activation |
You can change a workflow's status from the row action menu.
If a workflow is active, the action menu shows **Deactivate**. If it is inactive or draft, the action menu shows **Activate**.
## ➕ Creating a Workflow
Click **Create Workflow** to start a new workflow.
**🔖 Remembered Folder Selection**
When you select a folder, the page remembers that selection in the browser. If you come back later, the same folder can be selected again automatically.
If that folder no longer exists, the page returns to **All Workflows**.
**🏷️ Workflow Status**
Each workflow has a status badge.
Common statuses are:
| Status | Meaning |
| - | - |
| **Active** | The workflow is turned on and can run |
| **Inactive** | The workflow is turned off |
| **Draft** | The workflow is still being prepared and should be reviewed before activation |
You can change a workflow's status from the row action menu.
If a workflow is active, the action menu shows **Deactivate**. If it is inactive or draft, the action menu shows **Activate**.
## ➕ Creating a Workflow
Click **Create Workflow** to start a new workflow.
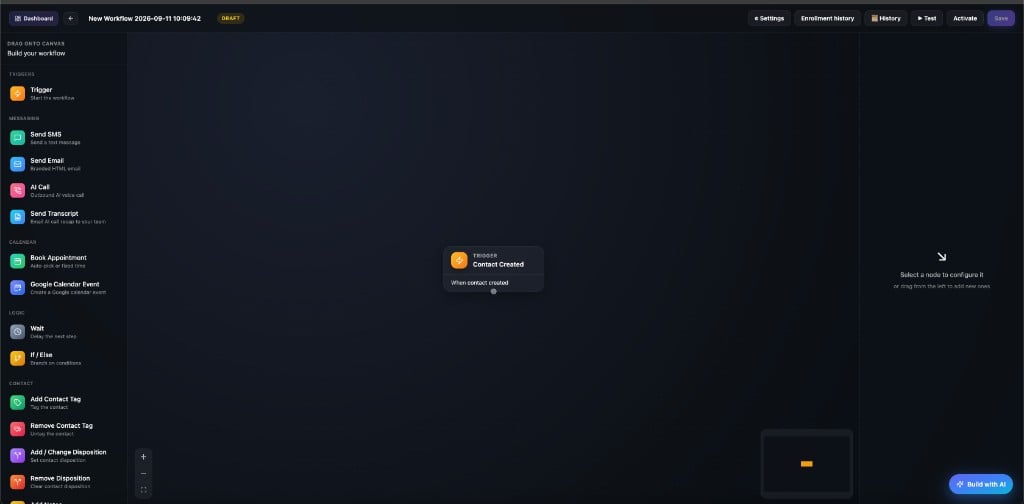
 The system creates a draft workflow and opens the workflow builder. From there, you can design the automation, update its name, add triggers, add actions, and save changes.
New workflows start as drafts so you can safely build and review them before turning them on.
## 📥 Importing a Workflow
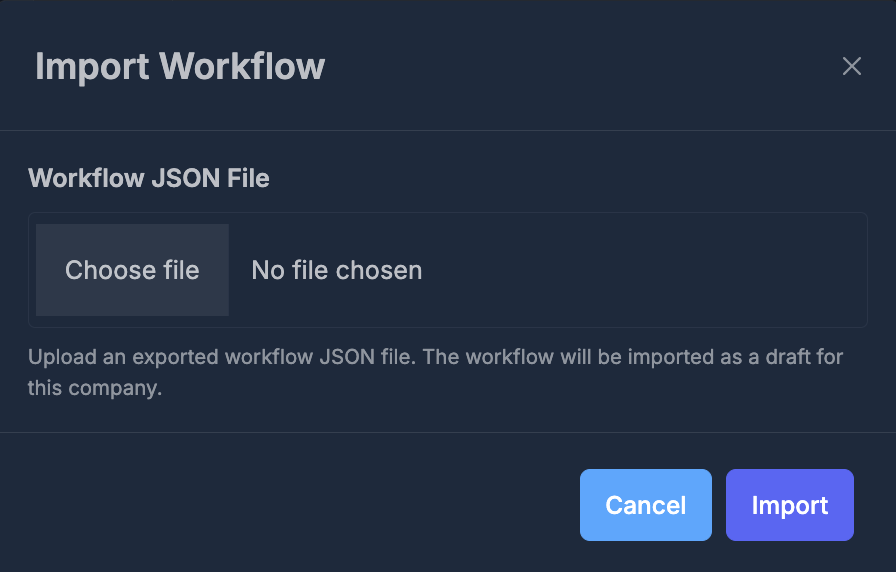
Click **Import Workflow** to upload a workflow JSON file.
The system creates a draft workflow and opens the workflow builder. From there, you can design the automation, update its name, add triggers, add actions, and save changes.
New workflows start as drafts so you can safely build and review them before turning them on.
## 📥 Importing a Workflow
Click **Import Workflow** to upload a workflow JSON file.
 Steps:
1. Click **Import Workflow**
2. Choose a valid workflow JSON file
3. Click **Import**
4. Wait for the import to finish
If the file is valid, the workflow is imported as a draft. You may be taken directly to the builder to review it.
Import is useful when moving a workflow between accounts, restoring a saved workflow, or sharing a workflow template.
## ⚙️ Workflow Actions Menu
Each workflow row has a three-dot action menu.
Available actions can include:
* **Edit**
* **Change Folder**
* **Activate** or **Deactivate**
* **Duplicate**
* **Export**
* **Delete**
The available actions may depend on your permissions.
**✏️ Edit**
**Edit** opens the workflow builder for that workflow.
Use this when you need to change the workflow name, trigger, actions, settings, or automation structure.
**📁 Change Folder**
**Change Folder** opens a popup where you can move the workflow into another folder.
Choose a folder, then click **Save**. Select **No Folder** if the workflow should not belong to any folder.
**▶️ Activate or Deactivate**
**Activate** turns the workflow on.
**Deactivate** turns the workflow off.
Use **Deactivate** when you want to pause a workflow without deleting it.
**📑 Duplicate**
**Duplicate** creates a copy of the workflow and opens the copy in the builder.
The copied workflow is created as a draft. This is helpful when you want to reuse a workflow structure without changing the original.
**📤 Export**
**Export** downloads the workflow as a JSON file.
Use this for backup, sharing, or migration.
**🗑️ Delete**
**Delete** removes the workflow after you confirm the action.
Only delete a workflow when it is no longer needed. If you may need it later, export it first or deactivate it instead.
**🔍 Searching and Browsing**
The workflow table includes search, pagination, and item-count controls.
Use search when you know part of a workflow name or need to quickly find a specific automation.
Use pagination when the account has many workflows. The table loads workflows in pages so the screen remains fast and organized.
**📭 Empty States**
You may see empty or limited content in these situations:
* **No folders yet** — no workflow folders have been created
* **No workflows in selected folder** — the selected folder does not contain workflows
* **No matching search results** — the search term does not match any workflow
When this happens, you can clear the search, select **All Workflows**, create a workflow, or move workflows into the selected folder.
## 🛠️ Workflow Builder
When you click **Create Workflow**, a workflow name, or **Edit** from the action menu, the **Workflow Builder** opens. This is where you design triggers, actions, and the full automation flow.
Steps:
1. Click **Import Workflow**
2. Choose a valid workflow JSON file
3. Click **Import**
4. Wait for the import to finish
If the file is valid, the workflow is imported as a draft. You may be taken directly to the builder to review it.
Import is useful when moving a workflow between accounts, restoring a saved workflow, or sharing a workflow template.
## ⚙️ Workflow Actions Menu
Each workflow row has a three-dot action menu.
Available actions can include:
* **Edit**
* **Change Folder**
* **Activate** or **Deactivate**
* **Duplicate**
* **Export**
* **Delete**
The available actions may depend on your permissions.
**✏️ Edit**
**Edit** opens the workflow builder for that workflow.
Use this when you need to change the workflow name, trigger, actions, settings, or automation structure.
**📁 Change Folder**
**Change Folder** opens a popup where you can move the workflow into another folder.
Choose a folder, then click **Save**. Select **No Folder** if the workflow should not belong to any folder.
**▶️ Activate or Deactivate**
**Activate** turns the workflow on.
**Deactivate** turns the workflow off.
Use **Deactivate** when you want to pause a workflow without deleting it.
**📑 Duplicate**
**Duplicate** creates a copy of the workflow and opens the copy in the builder.
The copied workflow is created as a draft. This is helpful when you want to reuse a workflow structure without changing the original.
**📤 Export**
**Export** downloads the workflow as a JSON file.
Use this for backup, sharing, or migration.
**🗑️ Delete**
**Delete** removes the workflow after you confirm the action.
Only delete a workflow when it is no longer needed. If you may need it later, export it first or deactivate it instead.
**🔍 Searching and Browsing**
The workflow table includes search, pagination, and item-count controls.
Use search when you know part of a workflow name or need to quickly find a specific automation.
Use pagination when the account has many workflows. The table loads workflows in pages so the screen remains fast and organized.
**📭 Empty States**
You may see empty or limited content in these situations:
* **No folders yet** — no workflow folders have been created
* **No workflows in selected folder** — the selected folder does not contain workflows
* **No matching search results** — the search term does not match any workflow
When this happens, you can clear the search, select **All Workflows**, create a workflow, or move workflows into the selected folder.
## 🛠️ Workflow Builder
When you click **Create Workflow**, a workflow name, or **Edit** from the action menu, the **Workflow Builder** opens. This is where you design triggers, actions, and the full automation flow.
 ### 🎨 Builder Canvas
The builder has three main areas:
* **Left sidebar** — drag triggers and actions onto the canvas
* **Center canvas** — visual grid where your workflow is built
* **Right panel** — configure the selected trigger or action
**Left sidebar groups**
| Group | Blocks |
| - | - |
| **Triggers** | Trigger — start the workflow |
| **Messaging** | Send SMS, Send Email, AI Call, Send Transcript |
| **Calendar** | Book Appointment, Google Calendar Event |
| **Logic** | Wait, If / Else |
| **Contact** | Add / Remove Contact Tag, Add / Change / Remove Disposition |
Triggers start the workflow. Actions run after a trigger fires. Use the **+** controls on the canvas to add more steps and connect them into a flow.
### ⚡ Available Triggers
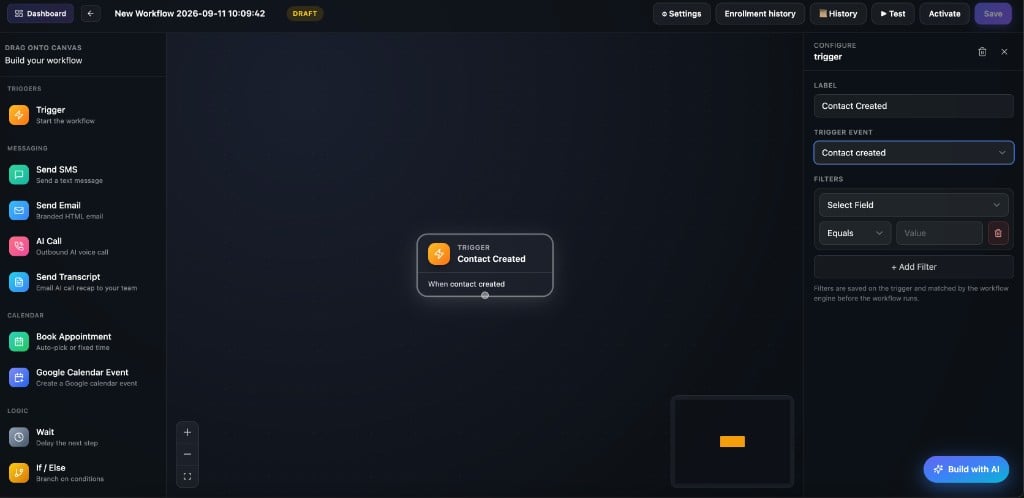
Drag a **Trigger** block from the left sidebar (**TRIGGERS → Trigger**) onto the canvas. Click it to open **CONFIGURE trigger** in the right panel, then choose a **Trigger Event**.
### 🎨 Builder Canvas
The builder has three main areas:
* **Left sidebar** — drag triggers and actions onto the canvas
* **Center canvas** — visual grid where your workflow is built
* **Right panel** — configure the selected trigger or action
**Left sidebar groups**
| Group | Blocks |
| - | - |
| **Triggers** | Trigger — start the workflow |
| **Messaging** | Send SMS, Send Email, AI Call, Send Transcript |
| **Calendar** | Book Appointment, Google Calendar Event |
| **Logic** | Wait, If / Else |
| **Contact** | Add / Remove Contact Tag, Add / Change / Remove Disposition |
Triggers start the workflow. Actions run after a trigger fires. Use the **+** controls on the canvas to add more steps and connect them into a flow.
### ⚡ Available Triggers
Drag a **Trigger** block from the left sidebar (**TRIGGERS → Trigger**) onto the canvas. Click it to open **CONFIGURE trigger** in the right panel, then choose a **Trigger Event**.
 **Configure fields**
| Field | What it does |
| - | - |
| **Label** | Name shown on the canvas block (for example, Contact Created) |
| **Trigger Event** | The event that starts the workflow |
| **Filters** | Optional conditions — Select Field, operator (Equals), and Value. Click **+ Add Filter** to add more |
Filters are saved on the trigger and matched by the workflow engine before the workflow runs.
**Trigger events**
Open the **Trigger Event** dropdown to pick from these groups:
**Configure fields**
| Field | What it does |
| - | - |
| **Label** | Name shown on the canvas block (for example, Contact Created) |
| **Trigger Event** | The event that starts the workflow |
| **Filters** | Optional conditions — Select Field, operator (Equals), and Value. Click **+ Add Filter** to add more |
Filters are saved on the trigger and matched by the workflow engine before the workflow runs.
**Trigger events**
Open the **Trigger Event** dropdown to pick from these groups:
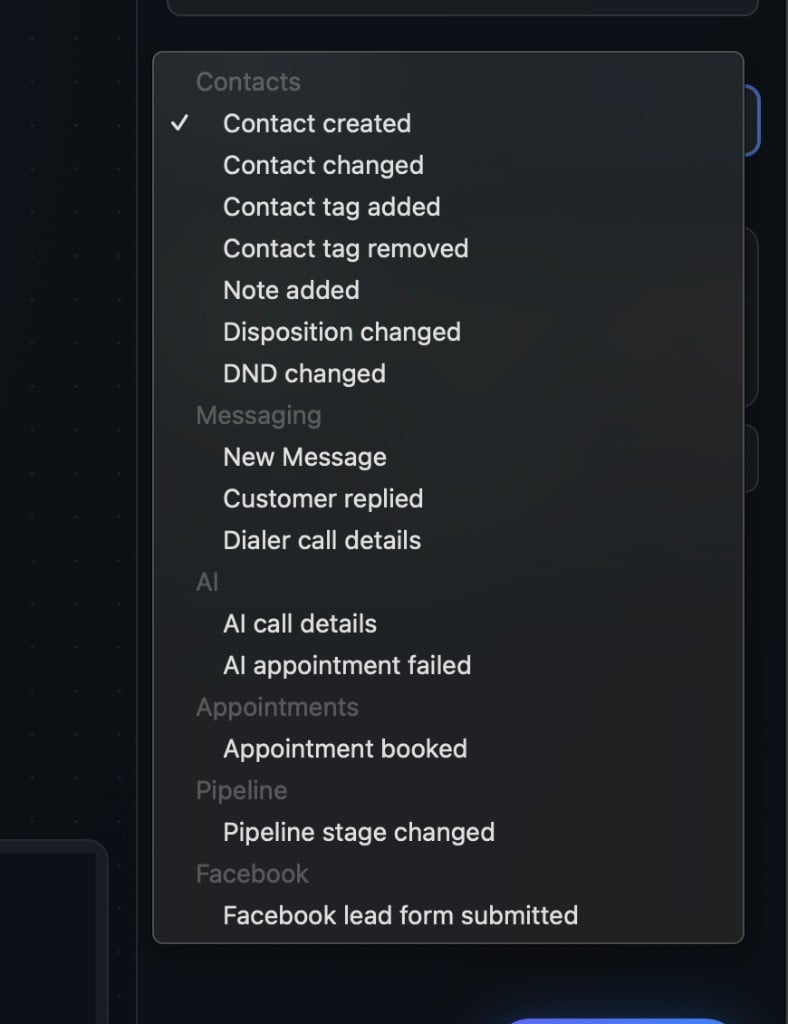 | Group | Trigger | When it runs |
| - | - | - |
| **Contacts** | **Contact created** | A new contact is added |
| | **Contact changed** | An existing contact's details are updated |
| | **Contact tag added** | A tag is added to a contact |
| | **Contact tag removed** | A tag is removed from a contact |
| | **Note added** | A note is added to a contact |
| | **Disposition changed** | A call disposition is set or updated |
| | **DND changed** | Do Not Disturb status for a contact is changed |
| **Messaging** | **New Message** | A new message is received or created |
| | **Customer replied** | A contact replies to a message |
| | **Dialer call details** | A dialer call ends or reaches a specific call outcome |
| **AI** | **AI call details** | An AI call ends or reaches a specific call outcome |
| | **AI appointment failed** | An AI appointment booking attempt fails |
| **Appointments** | **Appointment booked** | An appointment is booked |
| **Pipeline** | **Pipeline stage changed** | A contact is moved to a different pipeline stage |
| **Facebook** | **Facebook lead form submitted** | A Facebook Lead Form submission arrives |
Use filters to narrow when the workflow runs — for example, only when a contact is created in a specific PowerList or when a field equals a value.
### ⚡ Configure a Trigger or Action
Click any block on the canvas to open its settings in the right panel. Update the label, choose the trigger event, add filters, or configure action-specific options.
### ⚙️ Workflow Settings
Click **Settings** in the builder toolbar to open communication and timing options for the workflow.
| Group | Trigger | When it runs |
| - | - | - |
| **Contacts** | **Contact created** | A new contact is added |
| | **Contact changed** | An existing contact's details are updated |
| | **Contact tag added** | A tag is added to a contact |
| | **Contact tag removed** | A tag is removed from a contact |
| | **Note added** | A note is added to a contact |
| | **Disposition changed** | A call disposition is set or updated |
| | **DND changed** | Do Not Disturb status for a contact is changed |
| **Messaging** | **New Message** | A new message is received or created |
| | **Customer replied** | A contact replies to a message |
| | **Dialer call details** | A dialer call ends or reaches a specific call outcome |
| **AI** | **AI call details** | An AI call ends or reaches a specific call outcome |
| | **AI appointment failed** | An AI appointment booking attempt fails |
| **Appointments** | **Appointment booked** | An appointment is booked |
| **Pipeline** | **Pipeline stage changed** | A contact is moved to a different pipeline stage |
| **Facebook** | **Facebook lead form submitted** | A Facebook Lead Form submission arrives |
Use filters to narrow when the workflow runs — for example, only when a contact is created in a specific PowerList or when a field equals a value.
### ⚡ Configure a Trigger or Action
Click any block on the canvas to open its settings in the right panel. Update the label, choose the trigger event, add filters, or configure action-specific options.
### ⚙️ Workflow Settings
Click **Settings** in the builder toolbar to open communication and timing options for the workflow.
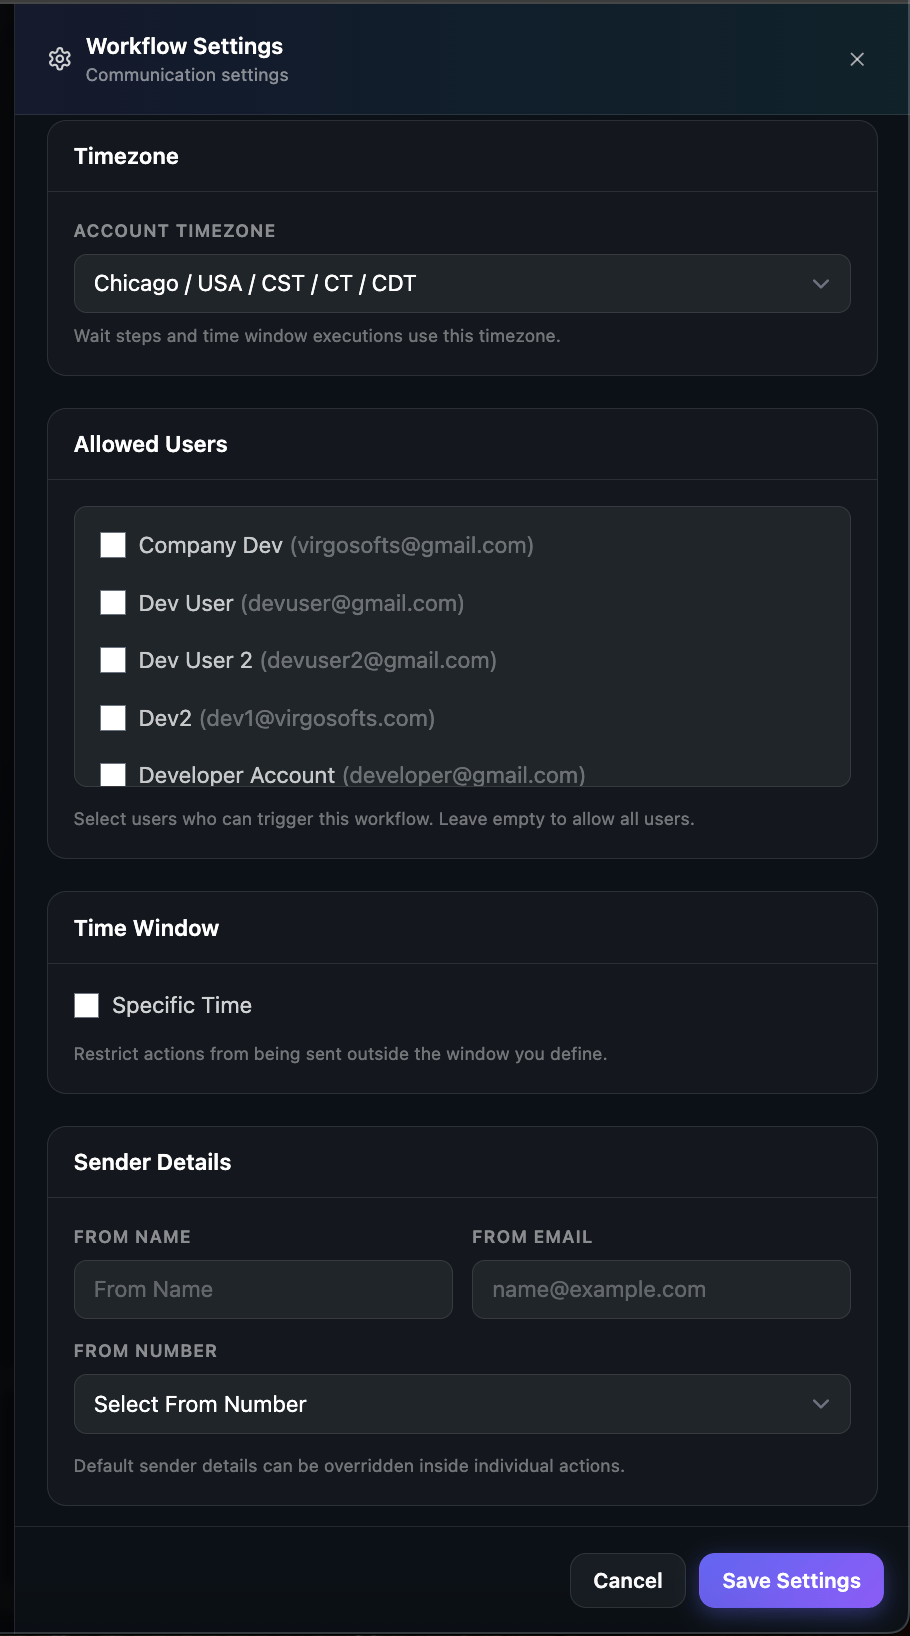 Available settings include:
* **Timezone** — used for wait steps and time window rules
* **Allowed Users** — choose who can trigger this workflow; leave empty to allow all users
* **Time Window** — restrict when automated actions may run
* **Sender Details** — default **From Name**, **From Email**, and **From Number** for outgoing messages
Click **Save Settings** when you are done.
### 🧪 Test, History, and Enrollment history
These three buttons sit in the builder header next to Settings, Activate, and Save. They apply to **this workflow only** — open the workflow first.
| Button | What it answers |
| - | - |
| **Test** | If this workflow ran for this contact right now, what would happen? |
| **History** | What happened on the last few runs — did each step succeed or fail? |
| **Enrollment history** | Who is in this workflow, why they entered, and where they are now? |
* **Test** — practice run you start yourself
* **History** — log of runs (tests and live)
* **Enrollment history** — roster of contacts who entered this workflow
Save the workflow first. Test stays unavailable while there are unsaved changes or the canvas is empty.
#### ▶ Test
Use **Test** to walk the path on the canvas without waiting for a real-life event.
**What a test does**
* Runs this workflow for a **contact you pick**
* Steps light up on the canvas so you can see the path
* **Wait** steps finish immediately (no real delay)
* **SMS, email, and similar messages are not actually sent** — the test pretends they succeeded
* After a test, **View Activity** opens that contact’s activity timeline
A green “Test completed” message means the practice run finished — **not** that a text or email went out.
**How to run a test**
1. Add your trigger and actions on the canvas
2. Click **Save**
3. Click **▶ Test**
4. Choose **Trigger to test** if there is more than one trigger
5. For a call-details trigger, also choose a **Call status** (for example No-answer)
6. Under **Phone / Contact**, search and select a contact (required)
7. Click **▶ Run test**
Watch the canvas. Then open **History** for step results, or **View Activity** for that contact.
**If Test will not start**
* Add at least one node to the canvas
* Click **Save** if it is available
* Select a contact in the Test window
#### 📜 History
**History** (panel title: **Execution history**) is the run log for this workflow. It shows the **last 50 runs**.
Each row typically shows:
* Contact name (or a run number)
* Steps finished vs total
* **FAILED** badge if any step failed
* Phone, trigger, and how long ago it ran
* Status icon: completed, failed, running, paused, or other
Click a run to expand:
* Trigger and overall status
* Started and Completed times
* Each step in order with completed / failed / running
* Red **error message** if something failed
* Short execution log in time order
If the list is empty, run **▶ Test** to create the first row.
Use History when a live SMS or email did not arrive — it shows whether the workflow ran and which step stopped.
#### 👥 Enrollment history
**Enrollment history** is the contact roster for this workflow (last **30 days**).
| | Enrollment history | History |
| - | - | - |
| Focus | The **contact** in this workflow | One **run** and its steps |
| Question | Who is enrolled, and where are they? | Did this run succeed? |
| Remove | You can take a contact **out** if still in progress | View only |
| Column | Meaning |
| - | - |
| **Contact** | Name and phone |
| **Enrollment reason** | Why they entered (trigger or event) |
| **Date enrolled** | When they entered |
| **Current action** | Step they are on now (for example Wait, Send SMS) |
| **Current status** | In progress, waiting, paused, completed, or failed |
| **Next execution on** | When the next step is due — dash means nothing scheduled |
| **Actions** | **Remove** if they can still be taken out |
**Filters:** Start / End date · Event · Contact search · refresh · Previous / Next
**Remove** appears only while the contact is still **in progress**. Confirm to stop them in this workflow — they are not deleted from your contacts list.
A successful **Test** does not send live SMS or email. Check **History** after a **live** trigger (workflow Active, real event) to confirm a real send.
### ✨ Build with AI
Click **Build with AI** in the builder to describe a workflow in plain language. The AI lays out triggers and actions on the canvas based on your prompt.
Available settings include:
* **Timezone** — used for wait steps and time window rules
* **Allowed Users** — choose who can trigger this workflow; leave empty to allow all users
* **Time Window** — restrict when automated actions may run
* **Sender Details** — default **From Name**, **From Email**, and **From Number** for outgoing messages
Click **Save Settings** when you are done.
### 🧪 Test, History, and Enrollment history
These three buttons sit in the builder header next to Settings, Activate, and Save. They apply to **this workflow only** — open the workflow first.
| Button | What it answers |
| - | - |
| **Test** | If this workflow ran for this contact right now, what would happen? |
| **History** | What happened on the last few runs — did each step succeed or fail? |
| **Enrollment history** | Who is in this workflow, why they entered, and where they are now? |
* **Test** — practice run you start yourself
* **History** — log of runs (tests and live)
* **Enrollment history** — roster of contacts who entered this workflow
Save the workflow first. Test stays unavailable while there are unsaved changes or the canvas is empty.
#### ▶ Test
Use **Test** to walk the path on the canvas without waiting for a real-life event.
**What a test does**
* Runs this workflow for a **contact you pick**
* Steps light up on the canvas so you can see the path
* **Wait** steps finish immediately (no real delay)
* **SMS, email, and similar messages are not actually sent** — the test pretends they succeeded
* After a test, **View Activity** opens that contact’s activity timeline
A green “Test completed” message means the practice run finished — **not** that a text or email went out.
**How to run a test**
1. Add your trigger and actions on the canvas
2. Click **Save**
3. Click **▶ Test**
4. Choose **Trigger to test** if there is more than one trigger
5. For a call-details trigger, also choose a **Call status** (for example No-answer)
6. Under **Phone / Contact**, search and select a contact (required)
7. Click **▶ Run test**
Watch the canvas. Then open **History** for step results, or **View Activity** for that contact.
**If Test will not start**
* Add at least one node to the canvas
* Click **Save** if it is available
* Select a contact in the Test window
#### 📜 History
**History** (panel title: **Execution history**) is the run log for this workflow. It shows the **last 50 runs**.
Each row typically shows:
* Contact name (or a run number)
* Steps finished vs total
* **FAILED** badge if any step failed
* Phone, trigger, and how long ago it ran
* Status icon: completed, failed, running, paused, or other
Click a run to expand:
* Trigger and overall status
* Started and Completed times
* Each step in order with completed / failed / running
* Red **error message** if something failed
* Short execution log in time order
If the list is empty, run **▶ Test** to create the first row.
Use History when a live SMS or email did not arrive — it shows whether the workflow ran and which step stopped.
#### 👥 Enrollment history
**Enrollment history** is the contact roster for this workflow (last **30 days**).
| | Enrollment history | History |
| - | - | - |
| Focus | The **contact** in this workflow | One **run** and its steps |
| Question | Who is enrolled, and where are they? | Did this run succeed? |
| Remove | You can take a contact **out** if still in progress | View only |
| Column | Meaning |
| - | - |
| **Contact** | Name and phone |
| **Enrollment reason** | Why they entered (trigger or event) |
| **Date enrolled** | When they entered |
| **Current action** | Step they are on now (for example Wait, Send SMS) |
| **Current status** | In progress, waiting, paused, completed, or failed |
| **Next execution on** | When the next step is due — dash means nothing scheduled |
| **Actions** | **Remove** if they can still be taken out |
**Filters:** Start / End date · Event · Contact search · refresh · Previous / Next
**Remove** appears only while the contact is still **in progress**. Confirm to stop them in this workflow — they are not deleted from your contacts list.
A successful **Test** does not send live SMS or email. Check **History** after a **live** trigger (workflow Active, real event) to confirm a real send.
### ✨ Build with AI
Click **Build with AI** in the builder to describe a workflow in plain language. The AI lays out triggers and actions on the canvas based on your prompt.
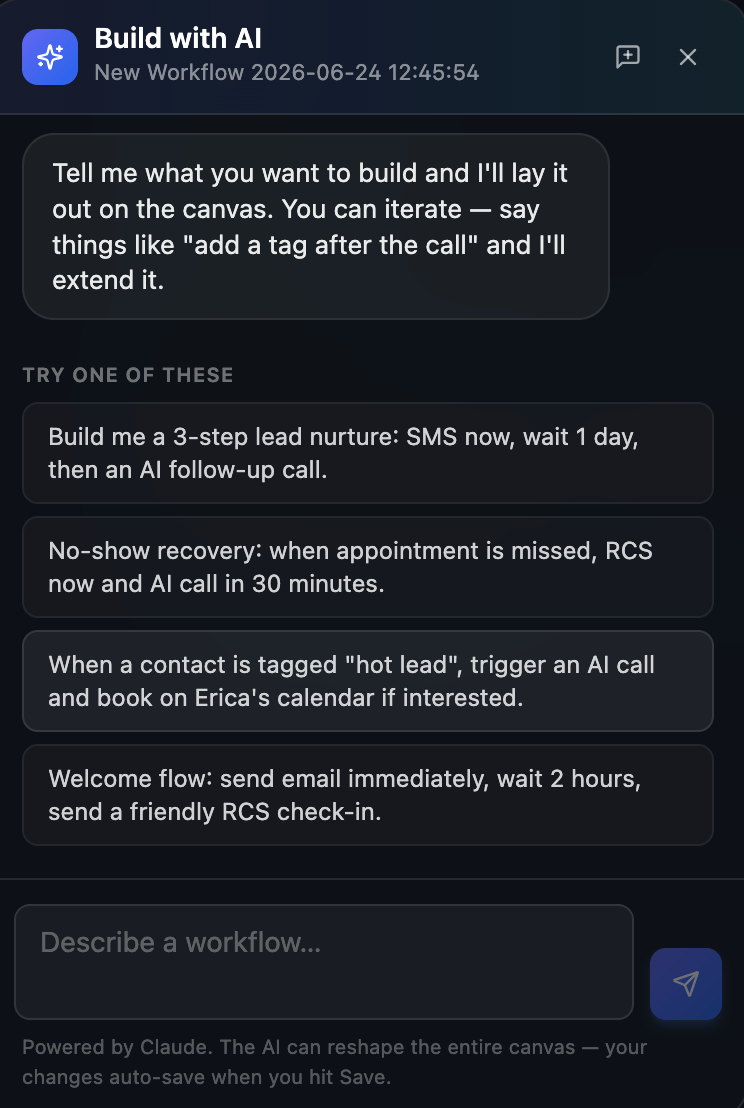 You can iterate by asking the AI to add or change steps — for example, *"add a tag after the call."* Your changes are saved when you click **Save** in the builder.
### 💾 Save and Activate
Use **Save** in the builder toolbar to store your design. Use **Activate** to turn the workflow on once it is ready. Use **Back** to return to the **All Workflows** list.
| I want to… | Do this |
| - | - |
| Practice a run | **Save** → **▶ Test** → pick contact → **Run test** |
| See step results | **History** → expand a run |
| See who is enrolled | **Enrollment history** |
| Stop a contact mid-flow | Enrollment history → **Remove** |
| Turn the workflow on | **Activate** |
For organization-wide past runs, see [Execution Logs](/workflow/execution-logs).
This documentation is built and hosted on [Mintlify](https://mintlify.com), a developer documentation platform.
You can iterate by asking the AI to add or change steps — for example, *"add a tag after the call."* Your changes are saved when you click **Save** in the builder.
### 💾 Save and Activate
Use **Save** in the builder toolbar to store your design. Use **Activate** to turn the workflow on once it is ready. Use **Back** to return to the **All Workflows** list.
| I want to… | Do this |
| - | - |
| Practice a run | **Save** → **▶ Test** → pick contact → **Run test** |
| See step results | **History** → expand a run |
| See who is enrolled | **Enrollment history** |
| Stop a contact mid-flow | Enrollment history → **Remove** |
| Turn the workflow on | **Activate** |
For organization-wide past runs, see [Execution Logs](/workflow/execution-logs).
This documentation is built and hosted on [Mintlify](https://mintlify.com), a developer documentation platform.