> ## Documentation Index
> Fetch the complete documentation index at: https://docs-old.aisync.link/llms.txt
> Use this file to discover all available pages before exploring further.
# Setup Contact Fields
**Setup Contact Fields** is the list of information a contact can have for your company — first name, phone, email, and any custom fields you add.
This page does **not** edit a person’s contact record. Changing a default here does not overwrite names, phones, or emails already saved on contacts.
Open from **Manage → Setup Contact Fields**. The page title is **Contact Fields**.
## ✨ What you can do
* See every field a contact can have
* Add extra fields (for example City, Lead Source, or a custom note)
* Copy the **Fields Key** for SMS, email, workflows, and similar messages
* Set a **Custom Default Value** used only when that field is empty on a contact
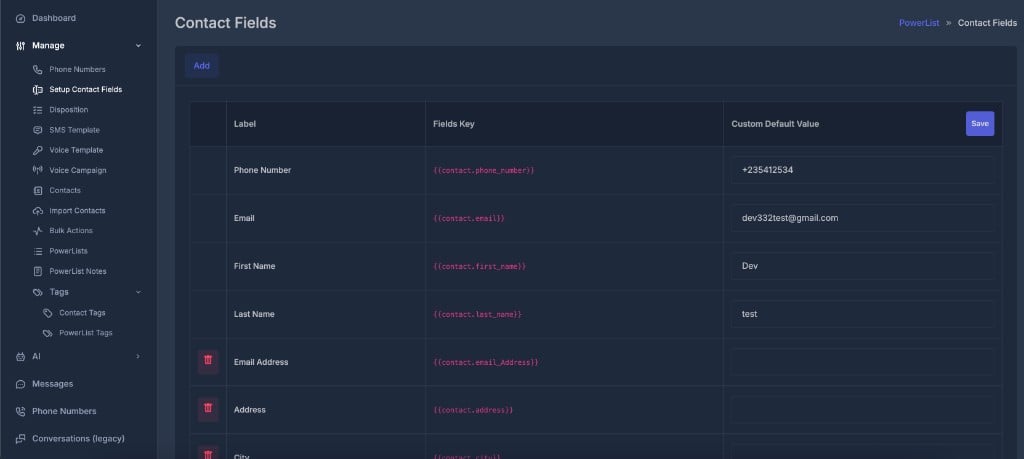 The header has **Add**. **Save** sits on the right of the **Custom Default Value** column header.
| Column | What it is |
| - | - |
| (trash icon) | Deletes a custom field. Core fields do not show a trash icon. |
| **Label** | Friendly name, such as First Name or Phone Number |
| **Fields Key** | Placeholder for messages, such as `{{contact.first_name}}` |
| **Custom Default Value** | Optional fallback text when that field is empty on the contact |
Click **Save** after you type or clear defaults. A success message confirms they were saved.
### 🔒 Core fields (cannot delete)
* Phone Number
* Email
* First Name
* Last Name
***
## 🔑 Fields Key
A Fields Key is a placeholder. When a message is sent, it is replaced with that contact’s value.
Example: `{{contact.first_name}}` → **Dev** if the contact’s first name is Dev.
Use the key **exactly** as it appears in the table. Do not change spelling or capitalization.
* Paste the key into an SMS, email, note, or template
* In the **workflow builder**, use **Insert field** to pick the same keys from a dropdown
***
## 📝 Custom Default Value
A Custom Default Value is company-wide fallback text for one field. It is **not** the contact’s saved value.
**When the default is used**
| Contact has a value? | Default saved? | What goes into the message |
| - | - | - |
| Yes | Yes or no | The **contact’s** value. Default is ignored. |
| No (empty) | Yes | The **Custom Default Value** |
| No (empty) | No | Blank — no error |
**What a default does not do**
* Does not change Contacts, PowerLists, or import files
* Does not replace a field that already has data on that contact
* Does not fill the Contacts screen
**How to save a default**
1. Open **Setup Contact Fields**
2. Type the fallback in **Custom Default Value**
3. Click **Save** in that column header
4. Clear a box and click **Save** to remove that field’s default
Example: First Name default **Dev** is used only when first name is blank. A contact named **Sara** still gets **Sara**.
**Where defaults and keys are used**
After you save, they apply wherever a message uses a Fields Key and that field is empty:
* Conversations SMS
* Workflow SMS, email, RCS, and notes
* Google Calendar event title and description
* Chatbot SMS replies
* AI agent calendar booking text
If the contact already has a value, that value is always used.
***
## ➕ Add a contact field
Use **Add** when you need a new piece of information on contacts.
The header has **Add**. **Save** sits on the right of the **Custom Default Value** column header.
| Column | What it is |
| - | - |
| (trash icon) | Deletes a custom field. Core fields do not show a trash icon. |
| **Label** | Friendly name, such as First Name or Phone Number |
| **Fields Key** | Placeholder for messages, such as `{{contact.first_name}}` |
| **Custom Default Value** | Optional fallback text when that field is empty on the contact |
Click **Save** after you type or clear defaults. A success message confirms they were saved.
### 🔒 Core fields (cannot delete)
* Phone Number
* Email
* First Name
* Last Name
***
## 🔑 Fields Key
A Fields Key is a placeholder. When a message is sent, it is replaced with that contact’s value.
Example: `{{contact.first_name}}` → **Dev** if the contact’s first name is Dev.
Use the key **exactly** as it appears in the table. Do not change spelling or capitalization.
* Paste the key into an SMS, email, note, or template
* In the **workflow builder**, use **Insert field** to pick the same keys from a dropdown
***
## 📝 Custom Default Value
A Custom Default Value is company-wide fallback text for one field. It is **not** the contact’s saved value.
**When the default is used**
| Contact has a value? | Default saved? | What goes into the message |
| - | - | - |
| Yes | Yes or no | The **contact’s** value. Default is ignored. |
| No (empty) | Yes | The **Custom Default Value** |
| No (empty) | No | Blank — no error |
**What a default does not do**
* Does not change Contacts, PowerLists, or import files
* Does not replace a field that already has data on that contact
* Does not fill the Contacts screen
**How to save a default**
1. Open **Setup Contact Fields**
2. Type the fallback in **Custom Default Value**
3. Click **Save** in that column header
4. Clear a box and click **Save** to remove that field’s default
Example: First Name default **Dev** is used only when first name is blank. A contact named **Sara** still gets **Sara**.
**Where defaults and keys are used**
After you save, they apply wherever a message uses a Fields Key and that field is empty:
* Conversations SMS
* Workflow SMS, email, RCS, and notes
* Google Calendar event title and description
* Chatbot SMS replies
* AI agent calendar booking text
If the contact already has a value, that value is always used.
***
## ➕ Add a contact field
Use **Add** when you need a new piece of information on contacts.
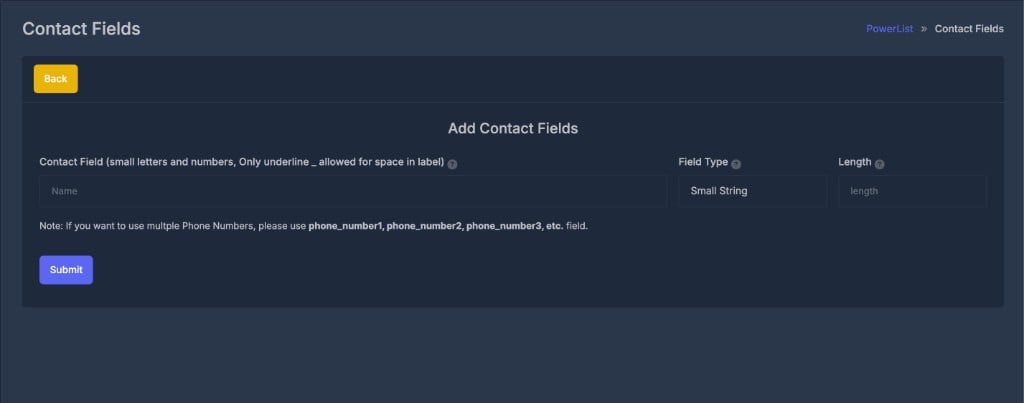 1. Click **Add**
2. Enter the field name using **lowercase letters, numbers, and underscores** only (spaces become underscores) — for example `lead_source`, `phone_number1`
3. Choose the field type:
* **Small String** — short text (you can set a length)
* **Text** — medium text
* **Long Text** — large blocks of text
4. Click **Submit**
The label under the name box shows how the name will look (underscores become spaces).
For multiple phone numbers, add `phone_number1`, `phone_number2`, `phone_number3`, and so on.
Reserved names (main phone, email, first/last name) cannot be created again. Choose a different name if you see that message.
***
## 🗑️ Delete a contact field
Only custom fields show a trash icon. You cannot delete Phone Number, Email, First Name, or Last Name.
1. Click the trash icon
2. Confirm
That column is removed from contacts, and any Custom Default Value for that field is removed too.
***
## 🔧 Insert field in the workflow builder
When a workflow step has a message (SMS, email, notes, calendar title, and similar):
1. Open the step in the builder
2. Use **Insert field** next to the text box
3. Choose a contact field
4. The matching Fields Key is inserted
The list includes your company’s fields from Setup Contact Fields, including custom fields you added.
***
This documentation is built and hosted on [Mintlify](https://mintlify.com), a developer documentation platform.
1. Click **Add**
2. Enter the field name using **lowercase letters, numbers, and underscores** only (spaces become underscores) — for example `lead_source`, `phone_number1`
3. Choose the field type:
* **Small String** — short text (you can set a length)
* **Text** — medium text
* **Long Text** — large blocks of text
4. Click **Submit**
The label under the name box shows how the name will look (underscores become spaces).
For multiple phone numbers, add `phone_number1`, `phone_number2`, `phone_number3`, and so on.
Reserved names (main phone, email, first/last name) cannot be created again. Choose a different name if you see that message.
***
## 🗑️ Delete a contact field
Only custom fields show a trash icon. You cannot delete Phone Number, Email, First Name, or Last Name.
1. Click the trash icon
2. Confirm
That column is removed from contacts, and any Custom Default Value for that field is removed too.
***
## 🔧 Insert field in the workflow builder
When a workflow step has a message (SMS, email, notes, calendar title, and similar):
1. Open the step in the builder
2. Use **Insert field** next to the text box
3. Choose a contact field
4. The matching Fields Key is inserted
The list includes your company’s fields from Setup Contact Fields, including custom fields you added.
***
This documentation is built and hosted on [Mintlify](https://mintlify.com), a developer documentation platform.