> ## Documentation Index
> Fetch the complete documentation index at: https://docs-old.aisync.link/llms.txt
> Use this file to discover all available pages before exploring further.
# Endpoint
> Use an agent’s unique call URL for outbound dials or inbound SIP connections from your website, form, or CRM.
**Endpoints** is the API reference for an agent’s unique call URL. Send a **POST** with JSON to start a call from your website, form, or CRM.
| Mode | What happens |
| - | - |
| **Outbound** | AI Sync places the call. The person’s phone rings. |
| **Inbound** | AI Sync does **not** ring the phone. It returns a SIP address (`dialSip`) so your phone system can connect the caller to the agent. |
Open from **AI → AI Agents** → agent **Actions → Endpoints**.
## ✨ What you can do
* Copy the agent’s unique **POST** URL
* Send **outbound** or **inbound** calls with the same URL
* Pass contact fields (name, email, and more) with the call
* Copy request examples in PHP, JavaScript, cURL, or Python
## 📑 What you see on the page
The page has two tabs: **Outbound** and **Inbound**. Switching tabs updates the hint, sample body, and response. The URL stays the same.
| Area | What it shows |
| - | - |
| **POST URL** | Agent’s unique webhook URL — use **Copy URL** |
| **Body · application/json** | Fields you can send (required marked) |
| **Request example** | Ready-made snippets by language |
| **Response** | Sample replies for 201, 400, 403, 404, 422 |
This URL belongs only to this agent. Do not share it publicly. Always copy it from this page.
***
## 📋 Fields you can send
Same body shape on both tabs. Extra contact fields are passed through so the agent can use them on the call.
| Field | Required | Notes |
| - | - | - |
| `phone_number` | Yes | E.164 format, starting with `+` (for example `+12137771235`) |
| `call_mode` | For inbound, yes | `outbound` (default if omitted) or `inbound` |
| `override_agent_id` | No | Use a different agent for this call only |
| `ghl_contact_id` | No | Attach a CRM contact to the call |
| `local_presence_number` | No | `Yes` or `No` — if Yes, place the outbound call from a local presence number |
| Other contact fields | No | Listed under **Optional contact fields** on the page |
***
## 📤 Outbound
Use **Outbound** when you want the agent to dial someone.
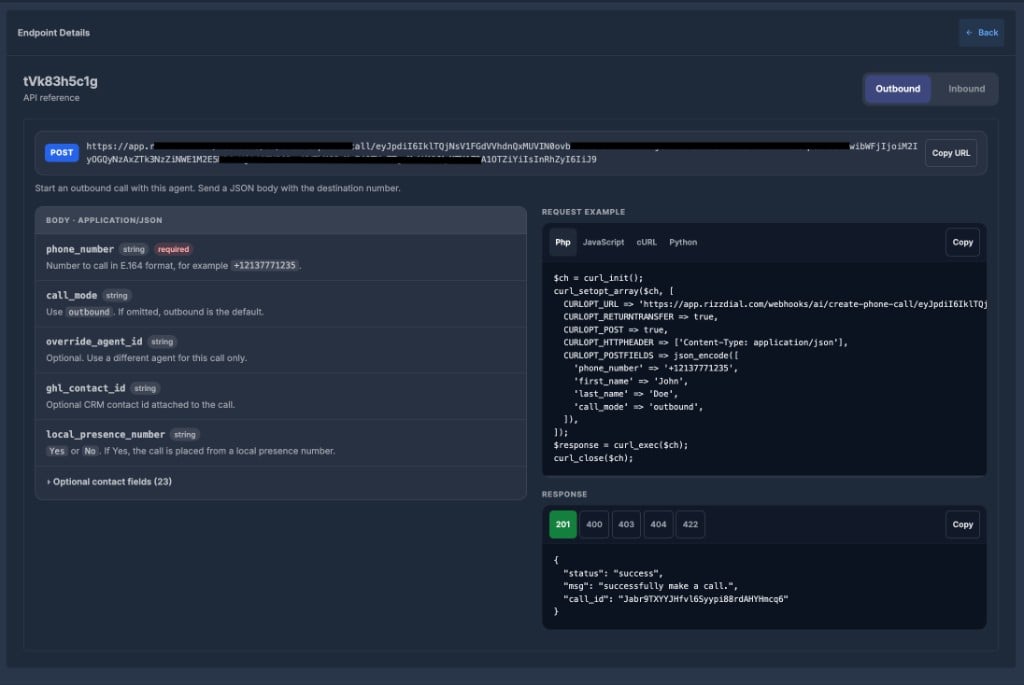 1. Open **Endpoints** and stay on the **Outbound** tab.
2. Copy the URL, or copy a request example in your language.
3. Send a **POST** with JSON.
**Example body**
```json theme={null}
{
"phone_number": "+12137771235",
"first_name": "John",
"last_name": "Doe",
"call_mode": "outbound"
}
```
You can leave `call_mode` out. If it is missing, outbound is used.
**Success (201)**
```json theme={null}
{
"status": "success",
"msg": "successfully make a call.",
"call_id": "..."
}
```
The person’s phone should ring. There is no `dialSip` on outbound.
***
## 📥 Inbound
Use **Inbound** when the person already called you (or will be connected by your phone system).
1. Open **Endpoints** and stay on the **Outbound** tab.
2. Copy the URL, or copy a request example in your language.
3. Send a **POST** with JSON.
**Example body**
```json theme={null}
{
"phone_number": "+12137771235",
"first_name": "John",
"last_name": "Doe",
"call_mode": "outbound"
}
```
You can leave `call_mode` out. If it is missing, outbound is used.
**Success (201)**
```json theme={null}
{
"status": "success",
"msg": "successfully make a call.",
"call_id": "..."
}
```
The person’s phone should ring. There is no `dialSip` on outbound.
***
## 📥 Inbound
Use **Inbound** when the person already called you (or will be connected by your phone system).
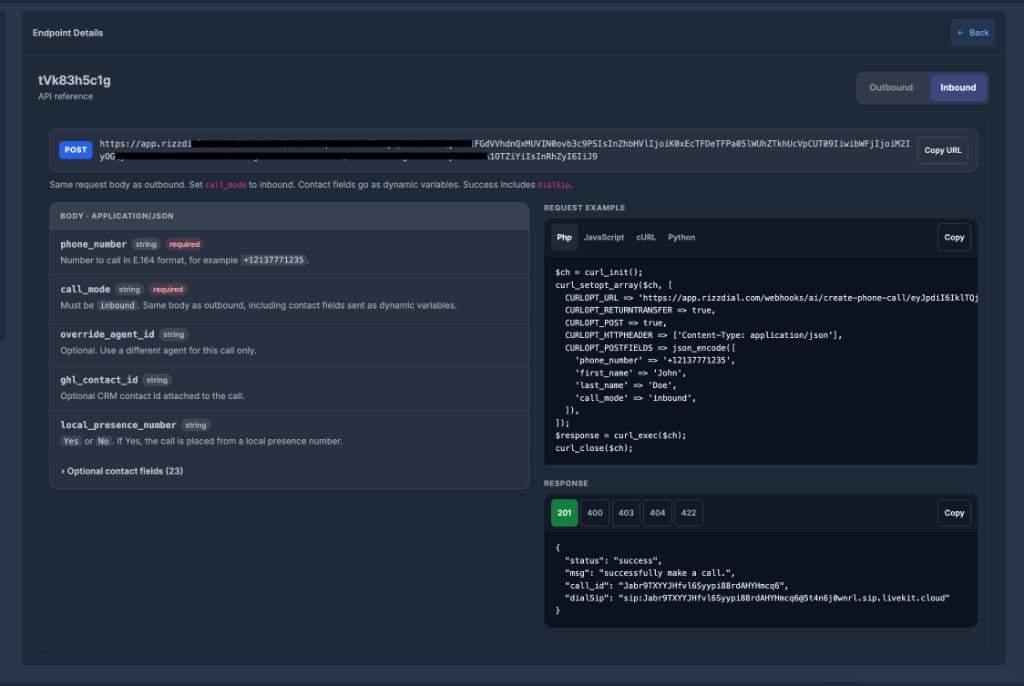 1. Open **Endpoints** and switch to the **Inbound** tab.
2. Copy the URL or the inbound example. The URL is the same — only the body changes.
**Example body**
```json theme={null}
{
"phone_number": "+12137771235",
"first_name": "John",
"last_name": "Doe",
"call_mode": "inbound"
}
```
`call_mode` must be `inbound`.
**Success (201)**
```json theme={null}
{
"status": "success",
"msg": "successfully make a call.",
"call_id": "...",
"dialSip": "sip:...@..."
}
```
This request does **not** ring a phone. That is expected.
* `call_id` — id of the registered call
* `dialSip` — address your phone system uses to connect the live caller to the agent
***
## 💻 Request examples
Language tabs on the page:
| Tab | What it is |
| - | - |
| **Php** | PHP snippet |
| **JavaScript** | Browser / Node `fetch` snippet |
| **cURL** | Command-line snippet |
| **Python** | Python snippet |
**Copy** copies the selected language. Replace the sample number and names before you run it. All examples send JSON with `Content-Type: application/json`.
## 📨 Response codes
| Code | Meaning |
| - | - |
| **201** | Success. Outbound returns `call_id`. Inbound also returns `dialSip`. |
| **400** | The request format is invalid. |
| **403** | The agent is inactive, or the account cannot place the call (for example insufficient balance). |
| **404** | The agent was not found, or no phone number is assigned. |
| **422** | The call could not be created. |
***
## ✅ Before you send a request
* The agent must be **Active**
* A phone number must be assigned to the agent
* Your account must have call balance
* Use a real `phone_number` in `+` (E.164) format
If something fails, the response includes `status: error` and a short message. Match it to the **403** / **404** / **422** samples on the page.
This documentation is built and hosted on [Mintlify](https://mintlify.com), a developer documentation platform.
1. Open **Endpoints** and switch to the **Inbound** tab.
2. Copy the URL or the inbound example. The URL is the same — only the body changes.
**Example body**
```json theme={null}
{
"phone_number": "+12137771235",
"first_name": "John",
"last_name": "Doe",
"call_mode": "inbound"
}
```
`call_mode` must be `inbound`.
**Success (201)**
```json theme={null}
{
"status": "success",
"msg": "successfully make a call.",
"call_id": "...",
"dialSip": "sip:...@..."
}
```
This request does **not** ring a phone. That is expected.
* `call_id` — id of the registered call
* `dialSip` — address your phone system uses to connect the live caller to the agent
***
## 💻 Request examples
Language tabs on the page:
| Tab | What it is |
| - | - |
| **Php** | PHP snippet |
| **JavaScript** | Browser / Node `fetch` snippet |
| **cURL** | Command-line snippet |
| **Python** | Python snippet |
**Copy** copies the selected language. Replace the sample number and names before you run it. All examples send JSON with `Content-Type: application/json`.
## 📨 Response codes
| Code | Meaning |
| - | - |
| **201** | Success. Outbound returns `call_id`. Inbound also returns `dialSip`. |
| **400** | The request format is invalid. |
| **403** | The agent is inactive, or the account cannot place the call (for example insufficient balance). |
| **404** | The agent was not found, or no phone number is assigned. |
| **422** | The call could not be created. |
***
## ✅ Before you send a request
* The agent must be **Active**
* A phone number must be assigned to the agent
* Your account must have call balance
* Use a real `phone_number` in `+` (E.164) format
If something fails, the response includes `status: error` and a short message. Match it to the **403** / **404** / **422** samples on the page.
This documentation is built and hosted on [Mintlify](https://mintlify.com), a developer documentation platform.